The go-to guide for everyone, from basic to detailed tidiers

The Problem:
#1 You have too many.
#2 You don't properly seperate them.
#3 You don't use basic products to help you maintain.
The Fix
Choose your level of Organization Below.
BASIC FIX: The Basic Fix is a great starting point for cord organization. If you need more detailed organization or have a large collection of cords, consider exploring the Detailed Fix below.
Toss: Get rid of damaged or non-working cords/wires.
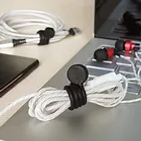
Tie: Secure working cords/wires with write-on cable straps or magnetic clip-ties.
Label: If using write-on label straps indicate what device/appliance each cord belongs to.
Store: Place them into the drawer, bin, box or other selected container.
WHAT TO BUY:


PROS & CONS:
Pros:
Quick and Easy: It's a fast and straightforward method, perfect for those who want a simple solution without a lot of fuss.
Effective Tangle Tamer: Bundling cords with cable straps immediately reduces tangles, making it easier to find and use them.
Basic Organization: It provides a basic level of organization, saving you time and frustration when searching for cords.
Cons:
Limited Visibility: If you have alot, storing cords in a drawer or container can make it hard to see what you have at a glance, potentially leading to duplicates or forgotten cords.
Minimal Categorization: Without further sorting or subdividing, you might still have to rummage through bundles to find specific cords, especially if you have many.
DETAILED FIX: The Detailed Fix is ideal for those who value efficiency, visibility, and a high degree of organization in their cord management. ALSO for those who have a larger amount of cables and wires to store.
Toss: Get rid of damaged or non-working cords
Tie: Secure working cords/wires with write-on cable straps or magnetic clip-ties.
Categorize: Sort by type (e.g, phones, video games, computer, etc.)
Subcategorize: if you have alot(e.g., Android vs iPhone cords). If you dont have alot, skip this step
Store: Place them into the selected containers by category.
Label: Write contents on each container.
WHAT TO BUY:


PROS & CONS:
Pros:
Maximum Organization: It provides the highest level of organization, ensuring every cord has a designated place and is easily findable.
Enhanced Visibility: Sorting and storing cords by category in labeled containers allows you to see exactly what you have at a glance, reducing the likelihood of duplicates or forgotten cords.
Adaptability: It can be customized to fit your specific needs, with subcategories accommodating large collections or personal preferences.
Cons:
Time Investment: It requires more time and effort upfront to sort, categorize, and label everything.
Storage Space: Using multiple containers might take up more space than a single drawer or box.
Maintenance: Retaining this level of organization requires ongoing effort to ensure cords are returned to their proper places after use.
What to Buy:
Remember, the key to cord control is finding a system that works for you. Experiment with these solutions, adapt them to your needs, and unleash your inner organizer!